
The software supports the ability to quickly place images of doors, door frames, windows and window frames on a wall. It also allows an image to be placed in a window to simulate viewing an outside scene. There are more realistic ways of doing this but they are more involved. This approach is quick and rather easy and works well for many applications. We will cover the more detail approach later.
From the Overhead View in the Detail Room area, right click on a wall and select Show Wall Elevation. An elevation view of the wall is displayed.
Now under Select Item to Install, select Door.
You are now presented with a dialog where you can define the door you wish to place.
In the Define Door dialog, you set the Width and Height of the door as well as selecting a texture for both the door and the trim around the door. Notice that you can apply either the door or the trim or both. These door images are placed directly on the wall but you can set the checkbox so the image appears on both sides of the wall.
Experiment placing doors on the wall to get a feel for the process.
In the last section we cut a hole in our room for a door as the start of an example of a realistic door presentation. It is possible to use the trim around a door to trim out this opening and then add a Display Panel to simulate an open door creating a realistic appearance.
To do this, from an overhead view of the room, bring up a wall elevation of the short horizontal wall at the top right. We have already cut an opening into this wall. Under Select Item to Install, select Door. Set the size to 36” by 83”, which was the size of the opening we cut in the wall. Select a dark image for the door trim.
Check Show Trim but uncheck Show Door. This will place the door trim but not the door itself.
Finally, check Apply to Both Sides and press OK.
Locate the door trim over the opening and click it in place.
 Press return to the overhead view
by pressing the Return button.
Press return to the overhead view
by pressing the Return button.
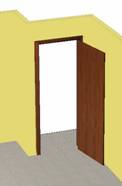
We now have a realistic door opening with a dark door frame.
It is shown here with the addition of a Display Panel used to simulate the door itself.
We will cover Display Panels later. You could also create a detailed 3D Display Object of a door and use that.
Now let’s look at handling windows.
Windows work much like doors. To demonstrate, we will create two windows in the long horizontal wall across the top or our room.
The first will be placed in the conventional manner. For the second we will cut a hole in the wall and place it in a manner similar to the way we just placed the door.
Start by cutting a 24” by 53” hole in the wall in the Create Wall area.
Then go to Detail Room, right click on the wall and select Show Wall Elevation.
From Select Items to Place, choose Window.
 We will address the open hole
first.
We will address the open hole
first.
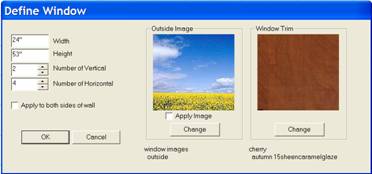
Set the width and height (24” X 53”) and set 2 vertical and 4 horizontal mullions.
Uncheck both Apply to Both Sides and Apply Image under the Outside Image display.
Press OK.
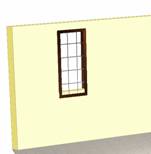
Place the window frame over the hole and click it in place.
Now, from Select Item to Install select Window again.
We want to place the frame on the outside of the wall, however, we do not want the mullions on this frame. Mullions on both sides of the wall doesn’t look right.
Again input the size, but this time set the Number of Vertical and Number of Horizontal to zero.
Make sure Apply to Both Sides of Wall and Apply Image are both unchecked.
Press OK.
Now right click on the wall and select Show Back.
This is the back or outside of the wall.
Locate and place the window frame.
Press Return to return to the Overhead View and then press Done.
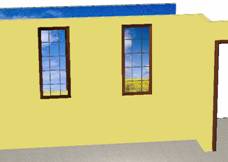
The result is a fairly realistic mullion window.
This creates a fairly realistic window but is somewhat involved.
There is a simpler approach that may be satisfactory for many applications.
Go back to the Detail Room area and select Window from the Select Item to Place list.
This time, add the mullions but also check Apply Image in the Outside Image area.
Note that you can take actual images of the outside and substitute them for the image presented here.
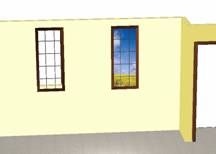
The result is a fairly good looking window, however, the perspective of the outside scene through the window is not correct except from a single elevation and the scene doesn’t move as you move and rotate the room as it would in a real room.
 It is possible to create more
realistic appearance, especially when moving the scene around, by placing a
copy of the outside scene on a large wall located a distance from the room.
This is the approach used in Hollywood
to create the illusion of outdoors. As you move around, the outdoor scene moves
in the window, just like it would in real life.
It is possible to create more
realistic appearance, especially when moving the scene around, by placing a
copy of the outside scene on a large wall located a distance from the room.
This is the approach used in Hollywood
to create the illusion of outdoors. As you move around, the outdoor scene moves
in the window, just like it would in real life.
For presentations to customers, it might be possible to take digital photos of their actual outside environment and place these on walls surrounding the room to offer an impressive and realistic presentation.
 Windows applied in this manner are
simply an image and are not three-dimensional objects. If you plan to use the Presentation View, which we will cover
shortly, you may want sunlight coming through the window. In this case, you
also want window muttons and mullions to shadow for a truly realistic
presentation. To do this, you need to place the window using a different
approach.
Windows applied in this manner are
simply an image and are not three-dimensional objects. If you plan to use the Presentation View, which we will cover
shortly, you may want sunlight coming through the window. In this case, you
also want window muttons and mullions to shadow for a truly realistic
presentation. To do this, you need to place the window using a different
approach.
Instead of using the Window selection from Select Items to Place, select Item and then select Doors/Drawers. Press Define Door and select a Conestoga – Frame Only – Mullion Door. Set the mullion pattern for the window you want and save the door. Then Place the door in the room inside the rectangular opening in the wall.
Now, when you shine a light through the window the mullions will shadow properly.
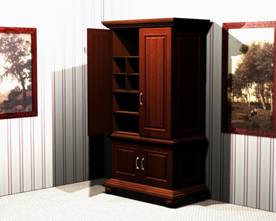
There is another use for the Window function that can be quick with dramatic results and that is creating hanging pictures or paintings.
Create a window the same size as the painting, select an image of the painting as the Outside Image and position the result. The window now looks like a painting not a window.
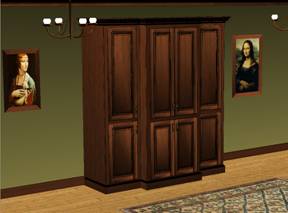 As you can see, stunning results
can be obtained with very little effort. There are thousands of art images
available on the Internet and placing them in a room is very quick and easy
using this technique.
As you can see, stunning results
can be obtained with very little effort. There are thousands of art images
available on the Internet and placing them in a room is very quick and easy
using this technique.
All these decorative touches are actually both practical and useful because anything that enhances your presentation to your clients can help you compete and sell.