 Therefore, if you want to adjust
parameters for all the doors you plan to add, change the parameters in the Construction Settings area. If you want
to change parameters for only one door, override the parameters during the
installation process.
Therefore, if you want to adjust
parameters for all the doors you plan to add, change the parameters in the Construction Settings area. If you want
to change parameters for only one door, override the parameters during the
installation process.
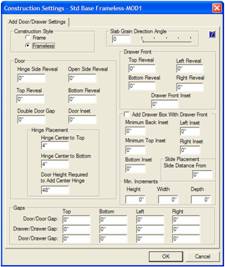
The basic idea is quite simple, first select a default door design then click and highlight the area where you want the door and click on the type you want, Right Hinge, Left Hinge, Double or Drawer. There are however, quite a few parameters needed to add a door to a cabinet. As with everything in the software, there is a set of parameters that define how a door or drawer is added to a cabinet.
These parameters are set in the Construction Settings area under Add Door/Drawer Settings. From the Main page of the Cabinet/Assembly Editor right click and select Construction Settings. Then, select Add Door/Drawer Settings.
You can also access this from the Door/Drawer Editor by right clicking and selecting Construction Settings. If you select it from the Door/Drawer Editor you will automatically be in Add Door/Drawer Settings.
When you change parameters in this area, they remain until you change them again. They do not affect existing doors but do define how new doors are added (unless, of course, you highlight a door before making the change).
You are also offered the opportunity to override these parameters each time you add a door. If you override the parameters when you install a door, they are only changed for that ONE DOOR. Parameters in Construction Settings remain unchanged.
Therefore, if you want to adjust
parameters for all the doors you plan to add, change the parameters in the Construction Settings area. If you want
to change parameters for only one door, override the parameters during the
installation process.
Construction Settings and cabinet defaults like hinges, pulls, door designs, etc. are maintained with the cabinet itself. Loading a cabinet also loads the settings and the defaults that existed when the cabinet was saved.
Note that there are two sets of Add Door/Drawer settings, one for frame and one for frameless. If the cabinet you are mounting the doors on is frameless, the frameless settings are used. If the cabinet is a face frame cabinet, the Frame settings are used.
Most of the settings are easy to understand. We will defer the drawer box settings which are covered in detail in another section of this manual that deals with placing drawer boxes drawer fronts. For the settings we will cover here, the one area that can be a little confusing is Gaps, so let’s look at it in more detail.
The system allows you to install more than one drawer or more than one door in a highlighted opening.
When you install multiples, gaps are used to separate them.
If you install a double door, the Double Door Gap (found in the Door area) is used for the vertical center gap. If you install one double door over another, that is two high, in a single opening, the gap as set in Door/Door Gap is used between them horizontally but the Double Door Gap is used between them vertically.
Because each side of doors and drawers can be assigned a different gap, they may come into conflict at times. Perhaps we set the Top gap for a door as .125”, and the Bottom gap at .25”. If we then put the two doors together, one gap says to make the separation .125” but the other gap says to make the same separation .25”. When this occurs, the system uses the largest gap, .25” in this case.
 There is one other case where these
gaps come into play and that is when placing doors and drawer fronts on
frameless cabinets with shelves or partitions.
There is one other case where these
gaps come into play and that is when placing doors and drawer fronts on
frameless cabinets with shelves or partitions.
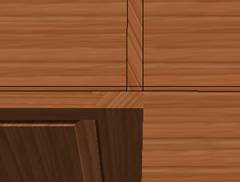
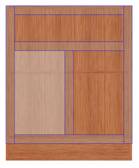
In the view to the left, we have added a door with a zero reveal to the opening on the left. As you can see, the door completely overlaps the center partition.
If we now try to add a similar door, also with a zero reveal, to the right opening, it would need to overlap the partition all the way to the left surface. This would mesh the two doors and is clearly unworkable.
To address this, the software uses the Gap settings to resolve the conflict.
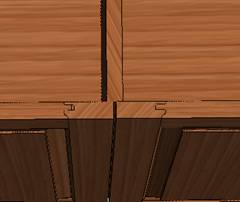
The image to the right shows the two doors. Notice that the gap has been located in the center of the partition and both doors resized to achieve the specified gap.
This approach makes placing doors and drawers on frameless cabinets quite a bit easier. Just set the gaps to what you want over shelves and partitions and place the doors and drawers.
There may be times where you may want to specify the exact positioning of the gap over a shelf or partition. Perhaps you want the gap to be positioned at other than the centerline of the shelf. In this case, set the gap for both doors or drawers to zero. When this occurs, the doors and drawers obey the reveal dimensions, even if this results in the two components meshing. If you set the Gaps to zero, you are in charge of the positioning of the joint and need to focus on this area carefully to prevent developing a design that cannot be produced.
The program does not perform the same function for face frame cabinets where overlaps rather than reveals are used to specify placement.
Also, an understanding of how the software uses overlaps and reveals might be useful, especially when working with more complex structures that combine face frames and frameless on the same cabinet. Since these cabinets do occur, a basic understanding might be useful.
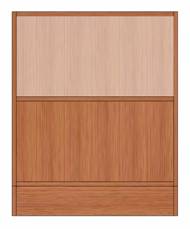
The key to understanding how doors and drawers are placed in the opening is the highlight area. When you click on an open area, the software looks around and tries to determine what you want. It then highlights the area it thinks you want to put a door or drawer over.
The frameless cabinet to the left shows such a highlight. The center shelf is fixed so the area above or below the shelf can be selected. If you want a door to cover a fixed shelf, the door must be added first and then the shelf added behind it.
Adjustable shelves are always ignored during the selection process and doors always cover adjustable shelves.
Now, focus on where the highlight ends. This is where the software sees the limit of the opening. It then looks at the reveal numbers for this door and measures from the edge of the highlight.
For frameless, it takes the thickness of the side, subtracts the reveal and adds the result to the highlighted area to determine the edge of the door.
The frame cabinet shown works much the same way. The system takes the size of the highlighted opening and adds the overlaps to determine the size and placement of the door.
Therefore, the key to understanding how the door will fit the cabinet is to analyze the highlighted opening. If Has Face Frame is checked in the Construction Settings- Face Frame dialog, even if every piece of the face frame has been deleted, it is a face frame cabinet. In this case, Overlaps will be used. If Has Face Frames is not checked, it is a frameless cabinet and Reveals are used.
Adding doors and drawers is then straightforward, simply highlight the opening and press the appropriate button. Adding more than one door or drawer to an opening however, needs further explanation.
The software allows you to add a stack of more than one door or drawer vertically to an opening. For example, you can place several drawers in a single opening.
If each of these is the same height, it is quite easy. Simply indicate the quantity at the top when the installation dialog appears and press OK. If you want to stack drawers or doors of different height it is slightly more involved but still not all that difficult.
In this case, you will need to add each different sized drawer one at a time.
Leave the quantity as “1” and set the height of the first drawer (note this also works for doors). Then you must decide whether you want the resulting opening at the bottom or top. If you set Adjust Bottom the drawer will be placed at the top of the highlighted opening and the remaining opening will be left at the bottom. If you select Adjust Top, the drawer is placed at the bottom of the highlighted opening and the remaining opening is left at the top.
You can, at any time, add multiple drawers of equal height to an opening but this will fill the entire opening. You cannot leave a gap when doing this.