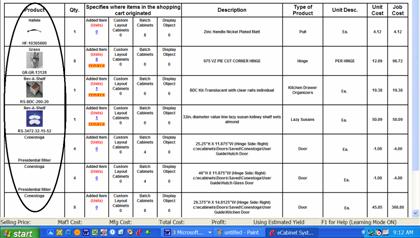
The layout of the Shopping Cart has been carefully thought out and contains a huge amount of information. Understanding the layout and use of the Shopping Cart will make the entire purchasing process more comfortable.
The first thing you will notice in the Shopping Cart is the name and image of each item as shown. This tells you the vendor and part number. If you double click on any image it takes you directly to a full description, a larger image, pricing and any other information available for that part.
You will notice that doors that were added to the Shopping Cart using the Add Door/Drawer Fronts can be opened in the Door/Drawer Designer by double clicking on them, allowing you to examine all the details of the design. You can make changes; however, the changes are NOT automatically made to the door already in the Shopping Cart. Items can be added to or removed from the Shopping Cart but they cannot be modified while in the Shopping Cart.
If you want to change characteristics of a door in the Shopping Cart, you can make the changes right here using the Door/Drawer Designer and then you can add the new design to the Shopping Cart as a new entry. Then, when you return, Remove the old entry.
Doors in the shopping cart because they are part of a cabinet cannot be opened.
The only way to change them is to actually change them on the cabinet itself.
The next column is the total number of the item in the Shopping Cart. This is how many you need, it is not necessarily how many you will buy.
When you move through the purchasing process, you will determine exactly how many you want to buy. Right now, this is simply a list of how many you need based on this Job and how many you manually added.
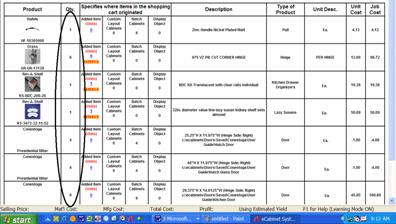
The next four columns tell you where the quantity actually came from. The column we just looked at told you the total number of each item you need. This area tells you what you need these for.
Added Items are those items you manually shopped for and specifically added to the Shopping Cart. Other than you saying you wanted to buy them they have no other tie to the Job or to any other part of the software.
Because you added these manually, you can edit them right here. Press the Remove button to remove the entire item from the list. If you want to change quantity, click on the quantity and a dialog will open allowing you to change the number.
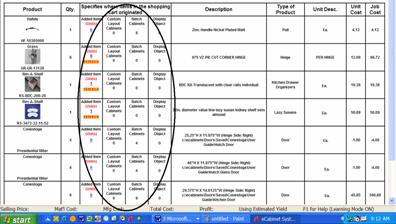
The last three columns show how many of each item are needed for other areas of the software. Custom Layout Cabinets means that this is the quantity of the item needed to build cabinets installed in the Custom Layout area.
 These numbers are fixed and you
cannot change them here. This is the number of items needed for the cabinets
you installed and the only way to change it is to change the number of cabinets
installed. Again, you don’t necessarily need to buy all these, this is simply a
listing of the requirements for this Job. The amount you actually purchase is
determined later.
These numbers are fixed and you
cannot change them here. This is the number of items needed for the cabinets
you installed and the only way to change it is to change the number of cabinets
installed. Again, you don’t necessarily need to buy all these, this is simply a
listing of the requirements for this Job. The amount you actually purchase is
determined later.
The next column, Batch Cabinets does the same thing for cabinets placed in the Job through the Batch Cabinets area.
The final category is for Display Objects. In the Custom Layout area, you can select and position many items available from vendors. The thing that determines whether you can display an object or not is whether there is a three-dimensional image available for it. If there is, it can be placed in the Custom Layout as a Display Object. When this happens, the item shows up in the Shopping Cart in this column.
Again, you cannot change the number here, but remember, this is not the quantity you will buy, it is the quantity you need. Once you click Order Now, you can then specify the quantity you want to buy.
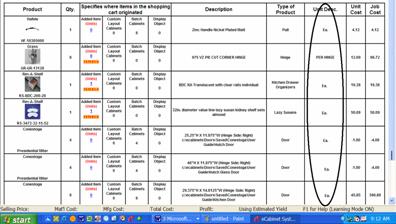
Before we order, we need to understand the Unit Description column.
This column describes exactly what you buy for the Unit Price. It lets you know if you are buying a piece (ea.), a box of 100, a set of three, etc.
Most items are available by the piece but there are exceptions, primarily for relatively low cost items such as screws, fittings, etc. In the case of these items, the software determines how many UNITS you need for the Job. For example, if you have a Job that needs 260 KD fasteners and they come in boxes of 200, it will indicate you need 2 Units (boxes). In these cases, you need to factor in the number of these items you have on hand and adjust the order quantity accordingly.